Tuesday, September 20, 2022

Solstice Singers costume for December performance

 Last year I made a costume that I never wore. After the performance in Dec 2021 I bought some linen to make a new dress but ended up using the mockup I made instead. It worked out well for the Spring performance.

But I finally have time to use the linen.....

I've made 2 rectangular construction dresses for myself. I feel confident making this style. The above garment also had lots of grommets so I'll add some on the side to make it more fitted. Maybe some tone on tone embroidery.

I'm also using the silk giornea from last year. I took out the lining and am fashioning it into a sideless surcoat.

This is over my cotton underdress from last spring. It is cut out shockingly lopsided wrt to pattern. I think I'll try rounding out the neckline to even it out. Also the front is too wide. I've pulled it in a bit. I think it should be slightly shorter than the underdress.


I'm finishing all of the seams of the underdress by hand. This looks greener than it is. It is more of an aqua.


I found some very cool fur on Amazon. I'm not sure if it is over the top?

Here are a couple with fur:


They do seem to be long, to the floor.

I like the look of the fur around the bottom. But don't want it off the shoulder.... I think.

Tried folding and pinning....


Seems promising but the fur is very thick/wide 4" or so.

I ended up digging in and cutting the shape and turned under the edges on the machine.

I also decided to try cutting the fur to reduce the width. Half width looked better around the neckline. 1/4 width for the armholes. I think full width on the hem.

The aqua under dress is on the right. So I think I'm mostly done except for lots and lots of hand sewing.... and maybe a hat? With fur?


Thursday, April 21, 2022

Dress and Cape for Child


This rectangular construction dress matches one I made for myself from a flannel sheet, but pillowcase sized(actually even smaller!). The hooded cloak is stretchy velveteen lined with gold holo latex. The child in question wasn't particularly interested when I brought them over but she will be eventually. 

It was great practice for my own under-dress which is waiting for the over-bodice to be done so I can determine the neckline. I've got over half the eyelets done. I'm trying a different approach, just whip-stitch rather than buttonhole stitch and it goes quicker! Then I have to decide on the hem and finish the shoulders....

Stay tuned!

Tuesday, April 19, 2022

Silly Girls Publicity shots

 Thanks to the costume designer I have these great shots:

I wasn't involved w/ Belle or Gaston's costumes but they look great!

The Silly Girls in the background.

 
Another great shot of the Silly Girls' dresses :


So in the end I'm glad I did it and did a good job but was also glad I was finished. My own dress for my spring concert with the Solstice Singers is well along in the 'mockup' stage and the underdress is almost done. I'm going to finish the mockup and probably use it with a long skirt for the concert rather than tackle the final aqua linen. I'm working on the eyelets and then there is only the hem and shoulder seams.... picture soon.

Sunday, March 20, 2022

Silly Girls costumes near completion


The Silly Girls at the second fitting

All three will have matching wigs and bows. The vests will lace up the front. The skirts have 4 drawstrings(2 in front and 2 in back) so they can be pulled way up if desired. The costumer likes one side. They were discussing which side it should be. 

I've been working on altering the vests which are fully lined. The green one was 4-5" too big. 


(Ack! Please excuse the toilet in the picture!) If I took it all in the back the back piece would all but disappear. I had to redo the shoulders anyway so I opened them. Turned it, unpicked the bottom and the top exposing all seams. I took in each seam by 1/4" which was 1/2" of circumference. Six of them totals 3". I took the remaining 2" out of the back piece. It wasn't as awful as I thought. I've turned it right side out but not pressed it. I'm debating another fitting before doing the eyelets but I want them to be done!

The orange one needs similar adjustments although not as drastic.

The yellow one is, I think, the one who said she was going to lose 25lbs by showtime. I didn't worry too much about fitting her vest, although it fit the best of the three already. If she she loses even 10lbs I think it would effect the fit. I'm going to finish the other two and then see where she is. I've tried to lose weight before and early goals often prove too ambitious. But sometimes those first 10lbs come off pretty easily.

The trick is to have the front not quite closed when laced up. I can also put in more eyelets in back to give extra cinch.

I've been concerned about the eyelets as one of my first tests fell apart but I tried another and it worked better. 10 per vest and 10 more if I add back cinching. That's a lot of practice.

Looking forward to getting these done and moving on to 2 new pouch styles I saw this week. I'm considering making some for the Silly Girls from scraps. I also want to make my linen dress. Ideas keep evolving..... more as they develop.....

Tuesday, February 22, 2022

Costuming again!

 Beauty and the Beast Silly Girls

Through my singing group Solstice Singers of Woods Hole, MA I met a woman who learned I made costumes. She's involved with the Falmouth Theater Guild  and asked if I'd be interested in helping with costumes for their production of Beauty and the Beast this spring. 

Lately I've been saying yes whenever something like this comes up. I had an opportunity to join the Solstice Singers last fall when I stumbled onto their signup booth at a music event near the public library. I hadn't planned on doing it right then... but there it was. I've found my life has been a series of these serendipitous events. I joined the group and made a costume:

Crocheted the snood, circlet is cardboard covered with fabric. The Giornea(overgown) is a heavy silk lined with a tablecloth. The belt is one I was given from a collection of jewelry and stuff, it has a shell on the front. I love the look but... the undershirt and yellow underdress are knit. Maybe OK if we were on a far away stage but our venue is small and we're pretty close to the audience... at least that was part of my rationale for not wearing it for the performances. Also, the combination of the silk and tablecloth was too much. It looks cool and swoopy outside but it would have been too hot indoors under stage lights and difficult to move around on the platforms we used. 


I ended up wearing a *gasp* Purchased Dress from China:

which you can see in the video. Wish I'd seen how it would look in pictures before I wore it. I find it a little too tight for my taste. I ordered it as 'insurance' in early November and it arrived Dec 13, the day of our dress rehearsal. The others in the group said it was flattering and encouraged me to wear it.

I also didn't like the snood look. I looked so washed out, so I made a stuffed circlet covered with pearl rope which matched the silk... but I ended up not wearing it so I made another thinner one covered with ribbon... hmm no pix of that.


But I have plans for this outfit. I want to make a shift and linen kirtle with tie-on sleeves. I've already bought the fabric, a gorgeous aqua color which matches a color in the silk. I'm going to try to follow Morgan Donner's tutorial. She has several different styles. I'm working on mock-ups until I can decide exactly how I want to proceed.

For the giornea I'm going to separate the tablecloth and the silk. The silk needs a much thinner lining. Also the v-neck needs to be much wider and go all the way to the waist. This will also lighten it a bit. The back is also supposed to be a V but I'm not sure it will stay on properly. I can make a second overdress from the tablecloth, which is gold brocade which you can barely see in the image on the right.


OK, back to BATB. I met the lead costumer and we decided I'd start with the Silly Girls. I'm worried about taking on too much and this seemed challenging enough but straightforward sewing and fitting, even though I'm not terribly experienced. 

So far I have the fabric and pattern.


Seersucker underdresses with vest and apron matching. I'm going to make the apron skirt gathered onto a waistband and put in casings and ribbons for cinching it up on the sides. The tricky part is fitting the lined vests. I only have measurements that someone else took. One person is about a 12-14, the others are larger, 22-ish and 26. I notice the pattern has a 10" difference between bust and waist, but most of the people have a thicker waist.... so I'm making mockups. Actually using drafting techniques I've seen but never used. I think it should work as I made one underdress and put it on my dress form and put the mockup vest over it and it looks ok.

So once I have the other dress and mockup made it will be fitting time. End of this week or next week depending on how much I get done today.... and I'm still waiting on the green seersucker which might arrive by the end of this week.

I'll update when there is more to show.


Thursday, January 7, 2021

Keeping busy at home in 2020 - a recap

After my last post in May 2020, I continued to explore various ways to use strips of fabric. Some orderly, some more chaotic. I lay them all on the bed and took a picture. The one from the previous post is near the middle.


 Some of them are large enough to make a bag. Eventually I ran out of gas and found that my fabric stash was in chaos... and it was spreading! My beads were in chaos! In fact, the entire room was a mess, and spilled into the guest room. I escaped to the attic where I brought a sewing machine and table. I planned on working on Chris's T-shirt quilt just to help clear out the guest room.

I didn't work on them right away but I did eventually with great success!

It isn't quite done. Chris noticed a few key ships were missing so he dropped off a bunch of other shirts which I haven't tackled yet.... but soon!

Meanwhile, I was working on organizing the fabric and the result is satisfying:

The shelves contain longer pieces of fabric wound around cardboard. Also fabric baskets(another project) with strips of various sizes that make scraps easier to work with:


I was playing around with some sampler blocks.

I also worked on bead organization but I'm not happy with the result yet. I got everything 'put away' but decided to try working on a project and it was difficult to find what I wanted. I need to work on it. 

However, as a result I have created a bunch of small pouches. I'm getting better at following the gridded design. It is tricky because the rows are offset.


Here's what I'm working on today:


Also made a bunch of these little card holders:

Guess I've been pretty busy since May!


Saturday, May 16, 2020

'Stripping' an abstract quilt


Today I watch a great show on PBS: Quilting Arts. In this episode, Nancy Ryan shared this amazing technique she calls 'Stripping an Abstract'. I immediately dropped everything to try it out. I am more than pleased with the result so far. I think this took me less than 2 hours. This is just the beginning, it still needs to be quilted and the edge finished. It looks complicated but is deceptively simple. Heat 'n' Bond (this is not an ad, just a convenient link) is the key, and a good rotary cutter, mat and ruler. I was just fumbling around and look what happened! Can't wait to do more!   

Tuesday, March 24, 2020

Hunkered down - producing face masks

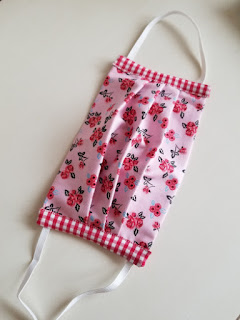
Well, the trip to England is postponed due to the coronavirus(covid19) outbreak. Just sitting around or just making pretty things leaves me feeling detached and helpless. So, I'm trying to be helpful by sewing face masks.
I used several tutorials and videos and made some adaptations to the pattern I'm using. I basically do this one (her image below):


But with a few modifications.
1) I cut 9"x14" to make the mask a little bigger. I use 7" of elastic.

2) When mass producing masks (lots of 4-8 are practical) I don't cut individual strips, I just make one long strip and cut it to length when pinning it in place. 6" is too long so there is a little bit of waste if you cut them first.

3) The mask above has no slit for a filter (such as a piece of vacuum cleaner bag or even a used dryer sheet) but it is very easy to make one:
 a) First step is to narrow hem both short ends,
 b) then when sewing that first seam, only sew 2" on either end, leaving a gap in the middle(see image below for result).
 c) When turning the mask, offset the slit from the very bottom. I have it face up near the bottom when making the tucks.

Another mass-production tip is to do each step for all the masks at once. I take this to the extreme and sew one side of the seam with the slit on each mask without cutting the thread, then do the other side. Similarly with the elastic I sew one corner on each mask without cutting the thread, then cut them apart and do the other end of that elastic, then the other side the same way. It takes a little maneuvering but saves thread and lot of thread clipping. Sometimes it makes sense to clip the string of masks apart between steps and sometimes not.


Here are some images of my masks in progress:
 Opps, that bottom image is 'upside down'. The slit goes toward the bottom, inside of the mask.
 Below is a closeup of the band, after stitching it to the mask, see how it is folded around the ends.
The band is turned out to enclose the raw edges, I often clean up any loose threads and trim the seam a bit before this step.


Wednesday, March 4, 2020

Made the scarf and...

Finally finished the entrelac scarf! Part of the reason was that I was working on a wallet and bag for my upcoming trip to London.
Knitting the scarf was an amazing experience. Entrelac is a fun technique/stitch. One thing about it is that one is constantly turning the work. I got bored with that and the result was I taught myself to 'perl back' without turning! This resulted in my teaching myself to knit left handed! After knitting for over 50 years this is quite a revelation. I hope I can apply it to my next project(the green yarns from my previous post).
It looks difficult but it is not. Just a lot of picking up stitches and turning, unless you can learn to go back and forth without turning. Pardon the random rainbows. There are prisms in the window.

Meanwhile, I'm in search of the perfect bag for my trip to London to visit cousins in a couple of weeks.
I found a great piece of fabric in my stash and purchased coordinating brown strap material, the trim, and the batik lining which isn't visible here.
Oops, I haven't tacked the boxed corners yet! You can't see the lining or the fact that it is a double bag. I love the stitching on the strap! I need to add some zipper pulls. I used this pattern. which I altered a bit. Didn't do as good a job on the zippers. Need more practice.
Also I made this cute wallet from this pattern:


But I think I'm going to make another wallet from the bag's lining fabric, which is marvelous. I used a thick fabric and didn't have the proper stiffener, but now I do. This makes a nice clutch but is bulky in the bag. Stay tuned for a post with the results and a picture of the inside of the bag.

Monday, February 3, 2020

Knitting and knitting and...

Awakened early thinking about the interesting variety of green yarn I found yesterday at a local fiber sale

The sale is at a local library each year on Superbowl Sunday, sort of a super bowl of yarn and fabric. Great bargains. I always have to hold myself back.

I think these interesting yarns will speak for themselves and so a pattern that features each one seems appropriate. Sort of a sampler. Probably a scarf. There isn't enough for a sweater.

As my electric kettle's blue LED clicks off and I start making coffee the room glows from the screen of my laptop. Outside it is just beginning to lighten.

My search uncovers two interesting ideas for how to achieve the effect I'm considering.

First is undulating short rows, in waves


The second is called Entrelac. I've never heard of this before but it looks very interesting and uses short rows in a different way.


 I like the organic feel of the waves but am also attracted to the orderliness of the entrelac. The waves all seem to have a 'background' color between the different colored waves. 
Generally I'm attracted to gridded techniques. Hardanger embroidery, Viking knit with wire; bead stitches like peyote, herringbone and right angle weave.
Knitting in general. 
The yarns are all different textures and slightly different weights. I think they'll lend themselves better to the waves.
I also found some wool/silk blend variegated yarn that might lend itself to the entrelac technique. I might try that first to see if I can figure it out.

Thinking about what to use for the 'background' in the waves. I have a bright aqua/turquoise which is very close to the teal color in the variegated green yarn. I also have some white/cream yarn I could use. Decisions, decisions.
Yellow, brown, olive and teal... definitely outside my usual color palate. Feels good to branch out a bit.

Full daylight now, probably not the best time to start knitting. Lots of other things to do.

Thanks for listening! All thoughts welcome.


Saturday, January 18, 2020

T-shirt quilt finished, plus more

Got this finished in early August but haven't had a chance to post about it.
84 squares, 42 per side.
It worked really well in the van during our trip from Aug 13-Oct 26.

From another angle:

The other side:

Since we got home I've been thinking about bead embroidery on photos printed on fabric.
To warm up, I dabbled with some of the beads I brought on the trip but never used, and some silk I'd ice-dyed a year or two ago.
Now working on using the heron from this image which I took on vacation on blue and white silk:
I had to zoom way in on the original image but the effect is interesting.
I drew the heron freehand on the silk(which came out ok!), then embroidered the edges and started filling in with beads. Will post finished piece when it is done.
Also have one more piece of dyed silk I'd like to try embroidering onto it a woodland scene.

Sunday, February 3, 2019

Starting again


Finally dug out the T-shirt quilt and fixed my mistake (somehow a 3" strip got mixed in causing a huge offset) and attached the 3 completed rows together:
To the left is the 'rag' side.
On the right is the other side.


Funny how a project can go 'stagnant'  because of a relatively small problem. And just a little nudge (this time from a YouTube channel I like to watch) can get you going again... thanks Jo!
Attaching the third row was slightly unwieldy. I've got 4 more rows. I think I'll assemble them into two-row chunks and then assemble with 3 more long seams. Adding each row will just make it more and more difficult to handle. I should probably move the machine to a wide open space for those last seams.

In the photo above it already nearly covers a queen sized bed! This thing will be huge. It is going in the van:

Things that got in my way of starting this last week included, hemming the sleeves of my new bathrobe which were ridiculously long, and making this cute thing:

It is a hanging set of bins that uses velcro to attach to the curtain rod. The thing is I used fabric samples and hardly cut anything. It was great to use a bunch of the samples. I used this tutorial which was lots of fun. Kind of a magical mystery while assembling and finally, voila! I'll be making more of these.
Also found a video to make these cute flowers(the flower part is at about 13:30;hmm, was supposed to fold the fabric strip in half to make loops... next time!):


I used a strip of an old bed sheet and a pair of rescued rhinestone earrings and practiced my glue-gun skills which are somewhat lacking. In the background is a square from the t-shirt quilt, a shirt from an aerobic dance class I took circa 1981. The shirt was hopelessly small, I had to add strips to the sides to make it big enough.
Here are more squares waiting to get into the quilt:
oops, and a peek at how overcrowded my 'studio' is. Too many shells, too much fabric, not enough time to create. Only 7 months until I retire and can play more!
I'm also covering some cardboard boxes with fabric. Many tutorials out there including the one with the flower linked above. I'll post the ones I tried and the results soon.
Today off to breakfast with a friend and then off to a fabric sale. I'm going to try to be good. Last year I only spend $10.

PS spent $30 but $20 on yarn and $10 on fabric, not bad. Time to find a good knitting pattern....